donderdag 21 juni 2012

RemObjects integration in Smart Mobile Studio (part 2)

In part 1, I explained how to create a very basic RemObjects service. In this post (part 2), I will show how easy it is to create a fancy looking mobile and web front-end for this service.
In the mean time, Smart Mobile Studio is updated(!), so get this new version to use the nice RO integration :).

First, we create a new project in Smart Mobile Studio (SMS):
Just choose a nice project name and press OK.

Now we can use the brand new RemObjects wizard to import our previous created RO service file:
(Smart Mobile Studio -> Tools -> Import Remobject SDK library)

In the wizard that pops up, we select our .rodl file (created by the "RemObjects Service Builder" tool):

We press the "import" button, and then we have a generated unit for our service!

As you see, it has a "{$R 'file:TestLibrary_intf.js'}" line in it. This javascript file contains the real client implementation, generated by the integrated RemObjects template engine in the wizard. This file is the same as you can generate with the "RemObjects Service Builder" tool. The magic is in some lines below. First we have our callback definitions (remember: everything is async! so no functions with a result, but you get the result async when the http call returns the value via the callback):
  TBasicService_Sum_Result = procedure(aResult: Integer);
  TBasicService_GetServerTime_Result = procedure(aResult: DateTime);
 Then the service class definition:

  { Service definition }
  TBasicService = class external 'BasicService'
    constructor Create(aChannel: TROHTTPClientChannel;
                                 aMessage: TROMessage;
                                 aServiceName: string = "BasicService");
    procedure Sum(
               A: Integer;
               B: Integer;
               aCallback: TBasicService_Sum_Result;
               aOnError: TErrorResult);
    procedure GetServerTime(aCallback: TBasicService_GetServerTime_Result;
                                            aOnError: TErrorResult);
  end;

You see the "external" keyword? This means our "BasicService" class maps directly to the javascript "BasicService" object (defined in the included $R TestLibrary_intf.js). We have a constructor with 3 params, which maps to the JS constructor. And we have 2 procedures (not functions!): Sum and GetServerTime. These are the same as defined in the .rodl file and implemented on the server side. Both procedures have a least a result callback and an error callback (in case the connection gets lost etc).

Before we can call these functions, we will make a simple form with some components on it. We place some labels and textboxes and a button on the form:

We can preview how it looks like using the preview button:

Looks nice isn't it?


Code

Now some real code and fun :). We go to the source ("Source" tab or press F12), create a button click event, and attach it to the button OnClick:
type
  TForm1=class(TW3form)
  private
    { Private methods }
    {$I 'Form1:intf'}
  protected
    { Protected methods }
    Procedure InitializeObject;override;
    Procedure FinalizeObject;override;
    Procedure StyleTagObject;reintroduce;virtual;
    Procedure Resize;override; 
    procedure btnSumClick(Sender: TObject);
  end;
Procedure TForm1.InitializeObject;
Begin
  inherited;
  {$I 'Form1:impl'}
  btnSum.OnClick := btnSumClick;
End;

procedure TForm1.btnSumClick(Sender: TObject);
begin
end;
To be able to call our RO service, we have to add the following uses clause:
uses
  RemObjectsSDK,
  TestLibrary_intf;
Now we can create a http channel, a JSON message, attach this to our client side TBasicService object and then call the Sum function:
procedure TForm1.btnSumClick(Sender: TObject);
begin
  var chn := TROHTTPClientChannel.Create("http://localhost:8099/JSON");
  var msg := TROJSONMessage.Create; 
  var srv := TBasicService.Create(chn, msg);
  srv.Sum(
    edtValue1.Text.ToInteger, edtValue2.Text.ToInteger,
    procedure(aResult: Integer)
    begin
      edtResult.Text := aResult.ToString;
    end,
    ROErrorCallback);
end;
We supply the 2 values of the 2 editboxes, and when calculation is done (on the server), we put it in the 3rd editbox (using an inline anonymous method).

Run

Now compile this and run it! ("Execute" or F9 in SMS). Oh, and don't forget to run the server we made in part 1!
We click on the "Sum" button and.... hmmm, not exactly what I wanted...

The reason is, I forgot something in the server project (in part 1): I must set the property "WrapResult" of the TROJSONMessage to True (see "Tips & Tricks" in this RemObjects wiki item). Now we recompile our server, run it, and click on the "Sum" button again:

That's better :).
And this is how it looks on an android smartphone (Samsung Mini, Android 2.3):

Now, is this very cool or not!? :)
It is of course a very simple example, I hope to blog more about this in the future.

Demo

If you want to run this demo yourself:

Note: string/integer helper classes

Note: I added 2 helper classes for "string" and "integer" to be able to use ToInteger and ToString on these basic types (like "edtValue1.Text.ToInteger"):
type
  TString_helper = helper for string
    function  ToInteger: Integer;
  end;
  TInteger_helper = helper for integer
    function  ToString: string;
  end;
function TString_helper.ToInteger: Integer;
begin
  Result := StrToInt(Self);
end;
function TInteger_helper.ToString: string;
begin
  Result := IntToStr(Self);
end;


vrijdag 15 juni 2012

RemObjects integration in Smart Mobile Studio (part 1)

In the next update (planned the 18th) of Smart Mobile Studio (SMS), full support for RemObjects SDK services will be added.
With RemObjects (RO) it is very easy to make multi tier applications. For example, you can create one or more RO services (as middle tier) to centralize your main business logic. And with the next SMS update, it is very easy to create nice looking mobile and web front ends (presentation tier) for these remote services!

In this blog, I will try to explain the basis steps to create a RemObjects service. And in the next blog I will explain how to use this RO service in (then updated) Smart Mobile Studio.

Under the hood

Under the hood, the SMS RO integration is actually a typed wrapper around "RemObjects for Javascript" (SMS generates javascript (JS) code after all :) ), and not a complete new implementation. This way, the high RO quality is maintained and all RO features are supported. Also future updates of "RO for JS" can be applied. However, SMS cannot apply smart linking and obfuscation to this external JS code.

Basic RemObjects service

First, we will create a very basic RemObjects service in Delphi, using the nice and easy RO wizard:
(Delphi -> File -> New -> Other -> RemObjects SDK)

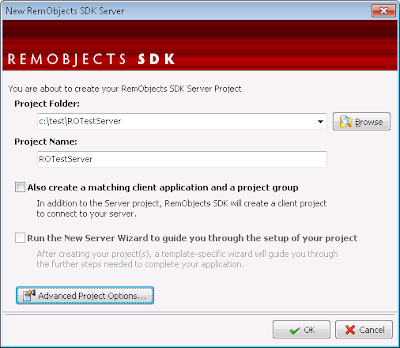
We choose for "VCL Standalone", because this is the easiest to start with (but if you plan to create a Windows service (for Intranet deployment), I can recommend to use the "Combo Service/Standalone" option). The first page of the RO wizard will be shown:

We choose a project name and folder, and we click on the "Advanced Project Options" for some more settings:

Here you can name the first "RO service" within the "RO library" (normally you will create a number of services, e.g. an OrderService for all order functions, and one library per Windows service). Most important is the HTTP "Server class" (in this case based on Indy, but you can choose other implementations), because this is the only option supported by "RO for JS" to communicate with the server (a browser cannot use plain TCP or Windows messages, however I already made a websocket server class). Next, we can choose between JSON and Binary message format. JSON is supported by all browsers, but binary is not fully supported by Internet Explorer (IE), so we choose for JSON to be on the safe side.

When we finish the wizard, RO will generate a server project for us:

The first thing we do is setting the "SendCrossOriginHeader" to true! This is needed, because our Smart app will run standalone and seperate from the http server. However modern web clients do not allow to call other foreign web servers (for safety reasons). There are other ways to solve this, but for internal use this single setting is the easiest :).

The next step is less obvious for first time RO users: we start the seperate "RemObjects Service Builder" tool  (via Delphi -> RemObjects SDK -> Edit service library). The RO wizard has created our BasicService with default 2 functions: "Sum" and "GetServerTime":

We can add more functions, structures, arrays, etc but we will leave this for now. We just close this tool and compile our server project in Delphi. Every time we create a new RO service within the RO Service Builder tool, the RO integration in Delphi will ask once at the next compile to create a implementation unit for the defined service:

We now have a "BasicService_Impl.pas" datamodule, which contains our 2 functions:
    function Sum(const A: Integer; const B: Integer): Integer;
    function GetServerTime: DateTime;
We will implement the simple :) functionality as follows:
    function TBasicService.Sum(const A: Integer; const B: Integer): Integer;
    begin
      Result := A + B;
    end; 
    function TBasicService.GetServerTime: DateTime;
    begin
      Result := Now;
    end;
This is all we have to do for our first RemObjects service, easy isn't it? :)
In the next blog post we will create a Smart client to use this remote service.

vrijdag 1 juni 2012

Remobjects via Websockets and in Node.js

After playing with Smart Mobile Studio (SMS) and RemObjects for Javascript, I thought it would be cool to have a HTML5 websocket communication channel (instead of only http). Note: websockets are some kind of "TCP over HTTP", so very efficient and fast for e.g. binary data.
At my current customer we use TROIndyTCPChannel and TROBinMessage internally, because this is the fastest option.

Websockets in Delphi

Because RO does not have websocket support (yet), I tried to make a Proof of Concept (PoC) to see if it is possible. I searched and tried some Delphi implementations, but one was old (Indy9, old websocket spec), otherone had no sourcecode yet (Indy10, no  response on my mail so far), etc. I found one which is based on "synapse", which is also included in RO, namely "bauglir-websocket".
I looked at how RO made their TRO***Server and TRO***Channel and made a simple implementation for websockets: uROWebsocketChannel.pas and uROWebsocketServer.pas. This was almost too easy :).
I tested this with a Delphi RO demo server and client (using the RO wizard) and: tada, it works! :).

RO websocket channel

Next I had to make a websocket channel in "RemObjects for Javascript", and after some copy and paste I added this to the end of the RemObjectsSDK.js file. I made a simple html test file and this one works too!

Node.js

Okay, what can we do next? Make a websocket server in html? Hmm, websockets (in html) can only make client connections and cannot act as a server...
Maybe I can use it in Node.js? Note: Node.js is a server side javascript implementation, based on the Google V8 Javascript engine.
I found a websocket chat demo in Node.js, so it should be possible... Because it is not easy to debug in Node.js, I tried to make it work in Google Chrome first, by using the "websocket.onmessage" event and by sending a fetched JSON string (using the network debug tab in Chrome) when the html page connects to my  Delphi server. After some hacking I could read the RO message, do the "sum" and send the data back to the client. Sweet!
After some little more hacking I also had it working in Node.js! So both my html page and my Delphi client can connect to the Node.js server. Ain't that cool! :)

Download and test

If you want to test it yourself, you can download the zip file, and do the following:
- start "ROWebSocketsServer.exe"
- start "ROWebSocketsClient.exe" and open "\client\client.html"
- push the sum buttons, both should work

- stop "ROWebSocketsServer.exe"
- start the node.js server via "\node\start RO.node.bat"
- push the sum buttons in the clients (maybe restart them?), both should work too :)